Pages

Tuesday, 19 November 2019

Tuesday Class


This first card made was the "fancy fold" card of the day, we always have a fancy fold card and the ladies all gave a big Oooooooo (Toy Story style when the aliens are all in the crane waiting to be won ha ha).   It was actually a simple card to make just lots of die cutting and a bit of embossing so more time consuming than difficult.  We all enjoyed making it and everyone was pleased when finished how super it looked.  Some chunky glitter on the boots to finish it off gave it that Christmas sparkle.  We used a Stampin' Up! stamp set called "Free Skate" which comes with a die set and it is just super.  

The card stands as an easel card and the acetate tucks behind the raised greeting section at the front.


Our next card was made by drawing round a dinner plate to get the curve on the front section of the card and I made a template for the paper by cutting about an inch less in size on the curve for the front paper.  I used 3 different stamp sets from Stampin' Up! the Petite Petals which has a matching punch for the purple flowers, Flourishing Phrases for the greeting and the other set is Vivid Vases for the blossom edging and the little leaves.  a simple greeting made this a universal card for any last minute card needed.  


The last card of the class used the Vivid Vases stamp set again and was a copy of a card I received in a swap but cannot remember who by.  It is a lovely simple layering card with everying stamped on one level on the white card then doubling up on the vase and flowers to cut out and make it 3d to give it dimention.  A bit of colouring with blender pens and a bit of dazzle from some Spectum Noir glitter pen and it looked super.


Thank you for visiting my Blog today, I hope you like the cards.

Happy Crafting

Jo. xx

Saturday, 26 October 2019

Tuesday Class

Well it was a full class today 6 lovely ladies crafting with drinks and fancy cherry cheesecake, lots of nattering and crafting it was a super day.

Here are our makes from this class.


Our first card was a Diamond fold card which can be made using either a normal score board / cutting board or score board depending which one you have.  I have quite a lot of different make craft books that go with previous boards I have bought in the past and have been reading through them for new ideas for class.  If you would like an instruction sheet drop me a message and I will send you them.

This card was made using the lovely Rich Razzleberry card stock and some DSP papers and stamped using Magnolia Blooms stamp set all by Stampin' Up! and although looks quite complicated it is an easy scoring project which looks super when it wobbles on the table.  We stamped in the Rich razzleberry ink then used a waterbrush to fill in the colour so you get a nice softer version of the ink colour to colour the petals, a dash of green on the leaves and a quick snip out and simply added onto the card with a simple greeting.


Our second card was made with a 6x6 white card blank and a piece of craft card 1cm smaller which was mottled with a combination of white ink refill and isopropyl alcohol mixed and sprayed over the card to get this super snow effect.  We used Peaceful Boughs stamp set for the greeting and leaves then punched a few red berries and topped with glitter.  This stamp set has a matching die set to make the lovely acorns.


This was my sample below 


This was a variation to show the greeting made onto a tag for alternative idea done by Sheila.


This was a variation adding some striped string down the side done by Mum.


Following the Christmas Theme we made a matching pillow box gift box using the matching die set and stamps as above and I have shown how simple it is to make it into a Christmas table setting by leaving the top open and adding a fancy serviette and some cutlery (simple but effective).


Thank you for visiting my blog today, please contact me if you would like to join my class or purchase monthly card class kits in the mail.

Happy Crafting

Jo. xx

Monday, 30 September 2019

Change of name

I am no longer a Stampin'  Up! Demonstrator but will be continuing  my monthly Cardmaking classes as usual.  I will be adding different brands along with my current SU stock

Happy crafting
Jo.

Hello Crafters

Saturday, 24 August 2019

Tuesday Class


This first card is an idea I got off Pinterest but I made a bigger 5" x 7" card base, it is made using one of the stamps from the Beatiful Day stamp set (you get a butterfly and a flower with greetings too).  I used HERMA 10021 Removeable Labels (amazon) recommended by our lovely demo Frenchie it worked great to mask the stamped images to stamp on top to layer the images. We then cut the bottom away to show the inner DSP inside. The top was sponged with ink and a greeting from the set finished off the card.  The trick to making it stand is to stamp the left rose near the bottom edge of the card front so not too much is trimmed off.


This cute little box we have made a few times over my years teaching card classes and it is one I often go back to for its simplicity and easiness to make.   The instructions can be found on Pootles blog or you tube site, Sam is the Box Queen of Craft lol..
The top one is the one made at class using the gorgeous hostess stamp set and matching punch set.  The bottom box is one mum made after seeing my class sampler.
We filled ours with sherbert lemons as Martyn said the colour would match the little birdie on the front x


This last card is a tent fold card, I haven't made one for a while and had forgotten how special it looks.  Don't be worried that it looks complicated it is so simple to create.  You simply cut a piece of card 4" long and as wide as your card blank then score at 1, 2, 3 inch and concertina fold and stick inside card after the inner paper stuck in place.  The front once the dsp paper has been stuck on (glue all over the sheet so does not flap when middle cut out).  I cut the circle out with layered circle framelet then using the sdame size again with one 2 sizes up make a circle frame to stick over the top.  This can be made into any occasion card.  The stamp set is adorable and it is from the Hoot Hoot Away set that is in the beginners brochure.


Tuesday, 30 July 2019

Tuesday Class

Well we had a full house today had to get an extra table out lol, lovely to see everyone together and a new lady for the day too.  We had a great craft n natter with sticky lemon drizzle cake and cups of tea all round.


This first card I have seen lots of demos make this by scoring and cutting on our scoring / cutting board and I have fancied making one for a while now.  Whilst browsing the internet I found this Sizzix flip flap die and thought it would be a lot quicker for a large group to make pre cutting on the Big Shot and they all loved it.  Once everything is cut is is actually quite quick to put together.  Made with Stampin' Up! dsp and card this is a beautiful card to send to a friend or relative.


Our next make was this lovely little bag to be filled with chocolates or sweets, super quick scoring and folding to create this special gift bag.  We made the ship one at class and I made another to show it looks nice in ladies colours too.

To Make:

1 card piece 10 x 3 1/2 inches and score @ 4.25 at each end
1 card piece 3 3/4 x 5 1/2 inches and score @ 1 inch all 4 sides

snip each corner square to make a tab and fold in and glue to secure.  Stick this inside the long piece of card once folded and punch a hole and tie a ribbon.


Our last card was super quick just simple matting and layering using the beautiful shimmery dsp mosaic mood and the greeting is one of the hostess sets Believe you can and the great Stitched Nested Labels Dies to layer up the image and background.  Coloured with blendability markers and sprayed with a shimmer bottle I made with an empty shimmer brush refil and some alcohol and water in a small spray bottle.


Thank you for looking at my blog today.
If you would like to look at Stampin' Up! products to buy online or contact me to buy direct just CLICK HERE
Happy crafting
Jo. xx


Sunday, 28 July 2019

Special Birthday

 This was a card order from a work friend Karen who wanted a large A3 folded card to celebrate her Mother's 80th Birthday.  Pastels, flowers and butterflies was the details required.  I enjoyed making this card using lovely Stampin' Up! products and Karen said her mum loved it.


Monday, 1 July 2019

Bonus Days


Bonus Days are back!


Boost your sales in July and August with Bonus Days.

If you are unfamiliar with this promotion, every 60 € | £45 you and your customers spend before 

1 July (before shipping and handling) earns a 6,00 € | £4.50 

Bonus Days coupon code that can be used 1–31 August.


Earning Period: 1–31 July 2019

Tuesday, 25 June 2019

Tuesday Class


This first card was cased from the fabulous Kim Fee who made one like this and I sent it to my class ladies to show them and they all went bonkers and thought it was fab.  I can not believe how simple this is to make yet how stunning it looks with any design.

Since making this at class I have made about a dozen of these and they even caught the attention of a lovely shop near me who is now selling my cards - I am so pleased I found this design.. thanks Kim :-)

I love this stamp set and when Mum decided she wanted it on her order we were all full steam ahead with class preps.  The set can be found on page 113 in the catalogue and is called Tea Together and there is as matching framelet set too on page 196.


This card I saw on Pinterest and just loved it, it is a notelet ize blank card 5 x7 folded in half, you could use the notelets on page 168 as a base as same size for speed if making several.


The boat stamp set is fab for that man in your life and it has a lighthouse, anchor and all sorts of other stamps.  It can be found on page 146 of the catalogue and has matching DSP that are great for backgrounds.


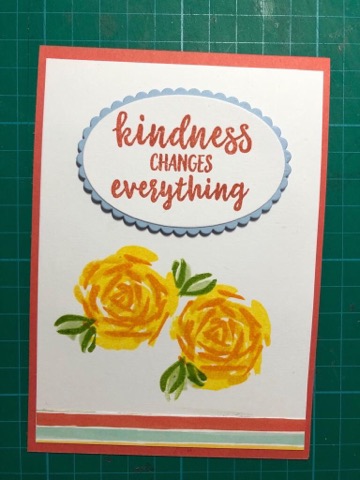
This last card was a simple 3 step stamping card featuring the lovely Abstract Impressions stamp set on page 116 of the catalogue. I have been tempted with the oval framelets for ages and bought them and tested them out on this lovely card.  This is quick to make to have in stock and you could make and leave the top white oval in the envelope ready to put the greeting of your choice once you have a recipient in mind.


Thank you for looking at my blog today.

If you would like to look at Stampin' Up! products to buy online or contact me to buy direct just

Happy crafting

Jo. xx

Wednesday, 29 May 2019

PAPER PUMPKIN KIT


I am pleased to announce that for this month only (at present, fingers crossed it will be a regular offer) the Paper Pumpkin Kit.  This has been a monthly offer in the US for a while now and they are looking at a possibility to bring it to other countries including the UK.
Part of what makes a Paper Pumpkin kit special is that we don’t reveal the projects inside the box ahead of time. This allows the purchaser to experience an element of surprise and excitement when they receive their kit in the mail. 
The Shelli kit from Paper Pumpkin includes the following:
An exclusive stamp set not available anywhere else
  • One Classic Stampin’ Spot from our Classic ink collection
  • Paper and crafting materials to create 12 cards (3 cards of 4 unique designs)
  • 12 exclusive, coordinating envelopes
  • Adhesives and embellishments for all 12 cards
Shelli describes the kit as “A touch of earthy and elegant spring with lots of layers and texture.”
And remember, everything in the Hugs from Shelli kit is pre-cut and ready to go. No planning or prep is required . . . which make these kits perfect for crafting at it's best with no prep required.

Coordinating Stampin’ Up! colours: Crumb Cake, Early Espresso, Old Olive, Petal Pink, Pool Party, Pretty Peacock, Soft Suede, and Very Vanilla
IMPORTANT NOTE: A clear block is not included, we recommend a size D block to use with this kit.


KIT IS JUST £20-00 order yours today


Contact me to order your kit tday - don't delay as they have limited numbers in stock


Happy Crafting

Jo. xx

Monday, 13 May 2019

TUESDAY CLASS


Free as a Bird 


This set is super cute card and I love the birds with their matching DSP paper that is just delightful patterns.  I think this is one of my favourite new sets and I was lucky to get it as a free choice at Stampin' Up! convention in April where we got to see the new catalogue and products.

This card was one of the kits we received to make whilst at the event and I think you will agree it is very bright and great card for most occasions.


Items used


·        FREE AS A BIRD STAMP SET 149468   £20.00 12 cling stamps

·        BALLAD DESIGNER SERIES PAPER  149592   £10.75

·        3/8" (1 cm) SCALLOPED LACE TRIM   Very Vanilla • 149593   £6.50

·        POOL PARTY A4 CARD  (24 sheets)  124391   £8.25

·        OLD OLIVE A4 CARD  (24 sheets)  106576  £8.25

·        WHISPER WHITE A4 CARD (40 sheets) 106549  £9.00

·        STAMPIN’ BLENDS Single  £4.25  Combo £8.50

·        Pineapple Punch, Daffodil Delight, Granny Apple Green, Old Olive, Crumb Cake


                                             CLICK HERE TO ORDER ONLINE


After 3rd June 2019 you will be able to download the New Catalogue by clicking the link at the top of the blog - if you would like a catalogue contact me and I will send you one.

Happy crafting

Jo xx

TUESDAY CLASS


DAISY LANE CARD


This uses a standard fold C6 card blank which has DSP cut to 14 x 9.5 cm to make a background.  It has a piece of Whisper white card cut to 5.5 x 7.5 cm and sliced diagonally to make a corner piece.  This was stamped with one of the leaf stamps from the set and the greeting was added on top.

The daisy was stamped onto powder pink card with black ink and the middle was coloured with a highlighter pen as found this brightest cover on the pink card with stamped image, you could stamp the daisy again in yellow ink and punch the middle out with a circle punch or framelet.


 All items used are from the current catalogue but can be used with any card colour options and DSP of your choice from the new catalogue.


       ** new catalogue CLICK HERE TO VIEW ONLINE **


Happy Crafting

Jo xx

TUESDAY CLASS

CIRCLE HANDLE GIFT BAG


The best adhesive to assemble these bag are the Tombow multi-purpose glue, it gives you the time to adjust the bag so it is straight.  

CARD PIECES
2 piece of 7 x 6 inches
score at 1¼ on 3 sides and  7″ at the top we do not score it is the handle side at the top. 
Snip out the bottom 2 squares on one piece of card and slash into the middle to male a thin wedge off the end edges so fits neatly into the other one when adhered to make the bag (this makes it fit easier and is not bulky when layers are glued).

DSP
2 of 4¼ x 4½ inches
Butterfly is punched out of the Sale-a-bration free DSP pack but could easily be a stamped image from one of your favourite stamp sets.

GREETING
This is stamped and punched out of 1 3/8 and 1 ¼ circle punches I used 2 different ink colours and a background stamp to make tag with a greeting on the top.  You can use different greetings depending what it is to be used for.

HANDLE


This is made with the circle framelets 2-7/8 and 2-3/8.

The easy way to cut the handle is nest both size together and cut the card stock. You will need 2 handle for each bag.   The 2-3/8 is the one that you will use for the opening on the bag. Each handle use 2 piece of 3¼ x 3¼ cardstock or silver foil then use the 2 3/8 smaller circle to cut the top of the bag so you have the space to adhere the handles.  (The above measurements are for the green bag.  There are other sizes available to make if you check out Frenchie on youtube which is where I cased this pattern from)

 All items used are from the current catalogue but can be used with any card colour options and DSP of your choice from the new catalogue - click the tab at the top of the blog to order online or view the catalogue when released 3rd June 2019.


Happy Crafting


Jo xx